In this tutorial, we are going to create a phone book CRUD (Create Read Update Delete) application using AngularJS for the front end and asp.net web API for backend services.
This tutorial here aims at explaining how to create AngularJS application utilizing asp.net web service and SQL server database. We may skip the basic concept of AngularJS which is not part of this tutorial but you can get those concepts from the official documentation of AngularJS.
Database:
First of all, we will create the database with name “PhoneBook” in Sql Server Management Studio and then a table with name “Directory” under that database with 3 attributes: Id, Name & Phone_Number. You can do that by using GUI or can also do that by running the following script.
Backend API:
Once the database is done, let’s move towards setting up your back end. We will create the Web API project in visual studio and steps are pretty simple:
Step 1:
Open Visual Studio and create a new project ( File > New > Project ). A window will appear, select “Web” from side menu under the hierarchy of “Templates > Visual C#” and then select “ASP.NET Web Application“. Name that application whatever you want, I named that “PhoneBookWebApi“. After clicking on “OK” you will see another window from where you have to select “Empty” and check the “MVC” and “Web API” checkboxes and click on “OK“. Hurray!! you have successfully created the ASP.NET Web API Empty Project. Next step is to add the data model and your controller in this project.
Step 2:
For adding data model right click on the model folder of your project which you can see in the solution explorer, hover on “Add” and select “New Item“. “Add New Item” window will appear. Select “Data” from the left menu and then select “ADO.NET Entity Data Model” and name that model. I named that “PhoneBookModel”

“Entity Data Model Wizard” window will open. Select “EF Designer from database” and click “Next“.

After clicking “Next” you will see a new screen where “New Connection” button is present. Click on that button. After that, you will see “Connection Properties” window which asks you to enter the server name and select the database that you want to link to your application.Configure these settings accordingly. If you are using SQL Server Authentication you will have to select that radio button and then you have to insert the password as well. I am using Windows Authentication and my server name is “tahahussain” and I am using the database name “PhoneBook” which you can see in below screenshot.
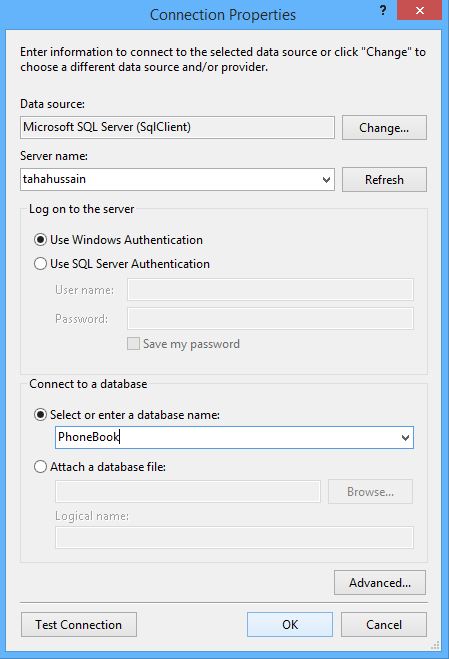
After selecting the server name and database name you will return back to the previous screen.Click On “Next” button on that screen after confirming your connection settings.

After that, it will ask you to select the Entity Framework you want to use. Select the latest version and click “Next“.

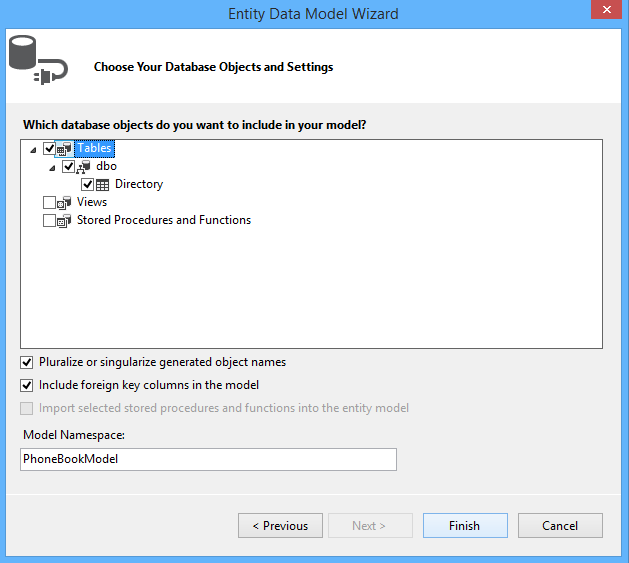
It will ask you to select the database objects you want to include in your model. Here we have just created the table with name “Directory” so there is only one object which we want to include. So mark that object and click “Finish“.
Finally, you have successfully added the data model into your Web API project. Build Your project after adding data model. (CTRL + SHIFT + B) is the shortcut key to building the project.
Step 3:
Now next step is to add the Web API controller into your project and for doing this, right click on the “Controller” folder of your project, hover on “Add” and select “Controller” option. you will see the “Add Scaffold” window from where you have to select the controller option from the left menu and then select “Web API 2 Controller with actions, using Entity Framework“.

Click on “Add” you will see the window from where you have to select your Model class and Data context class to make the controller of that model.Select the relevant model class and data context class which you set earlier name that controller if you want or leave it by default. You can see my selection from the below screenshot.

Click on “Add” and you are done adding the model and creating a controller in your application. You can run this application and get the response in XML by calling the service
Service Call: localhost:{Your Default Port}/api/Directories/1
For configuring this project with AngularJS application we need to go over a few more steps.
a) Enable JSON.
b) Enabling cross-origin requests.
a) Enable JSON.
By default Web API works on XML but we want to enable JSON and for that, we have to add some code in “WebApiConfig.cs” which exists in “App_Start” folder. Open “WebApiConfig.cs” file and place the below code inside “Register” function.
After adding this line you will see a red squiggly line below “MediaTypeHeaderValue” indicating an error. This is because the namespace is missing. Add the namespace mentioned below in that file to solve the error. You are done. Now you will get the response in JSON.
b) Enabling cross-origin requests.
As we are creating this API to utilize in AngularJS application and AngularJs uses AJAX requests to call the web API, we need to allow such type of cross-domain communication explicitly. The reason here is pretty simple: browser security prevents a web page from making AJAX requests to another domain. To overcome this issue we need to allow our API to give the response to any cross-origin request (we can prevent this to give response only the selective origins but here we are allowing all just for learning purpose).
This can be done by enabling CORS in our project. Add the CORS Nuget package by running the command in package manager console. To open package manager console, click on the “Tools” menu and hover “NuGet Package Manager” and select “Package Manager Console“, you will see the window as shown below.

Run the below command in that window.
After the execution of this command, we need to add a single line in “WebApiConfig.cs” file which is present in “App_Start” folder. Add the code shown below inside Register function.
And some additional code inside the “DirectoriesController.cs” is also required. We have to add the following line before the controller name.
After adding this line you will again see that annoying squiggly line under “EnableCors” because of the missing namespace. So just add the namespace listed below.
Finally, you are done for the backend services part of this project, After adding all the above code our “WebApiConfig.cs” and “DirectoriesController.cs” will look like this as shown below.
&
Front End:
Front end application is pretty simple just contains 2 files. One is HTML file which contains all the visible part of the application and other is AngularJS file which interacts with backend API. Here we are using bootstrap for designing.
Step 1:
Create a folder named PhoneBook and in that folder create a file with name “crudCtrlAndService.js“. This is our angularJs file which gets the data from service bind that data on view and vice versa. Below is the “crudCtrlAndService.js” code.
On the very first line, we name the module “phoneBookApp” and name the controller “CrudCtrl” and injected two dependencies which will be used in the controller. Dependencies which we used are “$scope” (the glue between application controller and the view) and “CrudService” (which we created at the end of this file for service calls). Then we created few functions named “loadTableData“, “addPhoneNumber“, “openUpdatePhoneNumberModal“, “updatePhoneNumber“, “openDeletePhoneNumberModal” and “deletePhoneNumber” which will be called from the view. Purpose of each function is clear from the names.
Now come to the service part which we created with name “CrudService“. In service, we inject the “$http” dependency because well will be doing HTTP calls from this service. Here a function is created with name “serviceCall” with parameters which will be passed in the HTTP call. In above service code, you can see that we are calling API from “http://localhost:11549” but it may be different for you and which you can get by running your Web API code and get that URL from your browser.
You are done with JS part the only part remaining is how to present data on the front-end HTML page and pass it to JS when we want to perform any action.
Step 2:
Create a file with name “index.html” and paste the below “Index.html” code in it.
HTML is not the focused part of our tutorial and I assume you know the basics of HTML so we will only discuss the JS part used in the above code.
In the about template there is a form to submit the data, a table to show the inserted data and bootstrap models for updating or deleting data. In the head tag of this HTML file, we added all the relevant scripting files which will be used in this application including the file which we will create earlier with name “crudCtrlAndService.js“. In the body tag, we need to add “ng-app” directive to bind the app with our “phoneBookApp” module and add “ng-controller” directive to bind with our “CrudCtrl“.
Then we create a form with “Name” and “Phone Number” field which we will submit by calling “addPhoneNumber” function, Here we bind the data by using “ng-model” directive.
Whenever we hit the “addPhoneNumber” function it will show success alert and populate the table with data which we inserted. In table row we are using the “ng-repeat” directive which gets the data from the server in “phoneBookData” array iterates it here.
Here we have the update and delete functionality too. We can update the inserted data by clicking the pencil icon, it will show the model with old data you just have to change the data and click on “Update” and for deleting just click on trash icon, a model will open click on “Delete“. It will change the table data on each action you perform without loading the page.
How To Run:
After following all the above steps you have to run your backend code from visual studio. (F5) is the shortcut key for the running project. After that you have to run HTML file in your browser by right clicking on your “index.html” file and open it with google chrome (or any browser).you will see something like this as shown below.
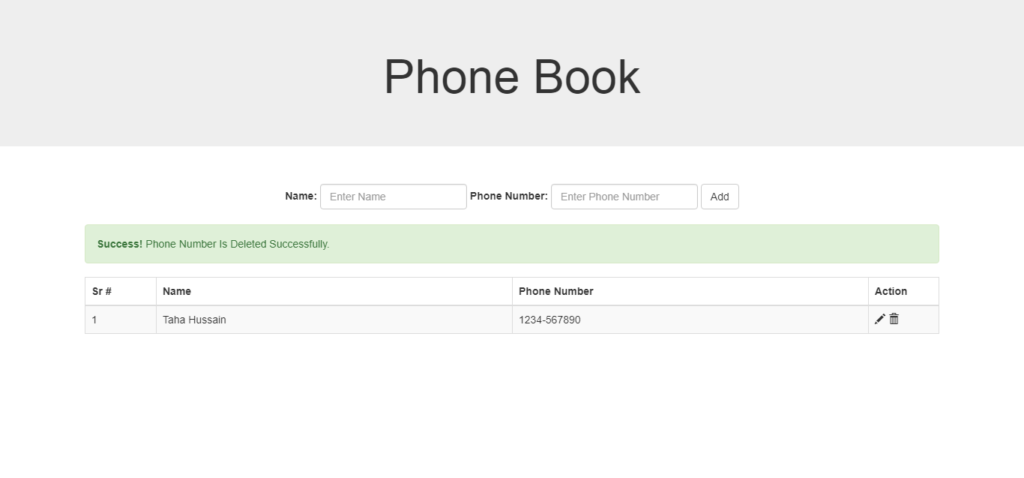 Hurray, you have successfully created your project.
Note:
You have to get the port number on which your Web API is running and change it in “crudCtrlAndService.js” file.
For Eg: In my system, Web API project is running on “http://localhost:11549” (Port: 11549) so I placed this in “crudCtrlAndService.js” file. (line # 81)
Thanks, for your time. It’s awesome.