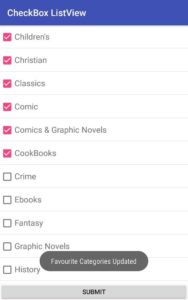
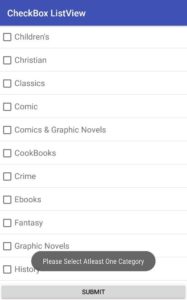
In this tutorial, we are going to populate the Android ListView with CheckBox using a custom adapter.We will get the data (Categories) from the database allowing the user to mark the data (Favourite Categories) and then again insert the data (Favourite Categories) in the database (PHP On Server Side). This CheckBox selected data is quite tricky for beginner developers and almost all the beginners face this issue of ListView that when we scroll the ListView after checking the CheckBox the CheckBox gets unselected every time it leaves the view and the reason is quite simple i.e the view gets recycled due to the recycling of ListView mechanism.Thus the CheckBox does not maintain its state. We have to make them maintain the state and get the state back when it come in the view again which we will cover in this tutorial.
Here is the structure (Java and XML) which we will follow in this example.
You have to create the “Empty Activity” project in Android Studio with name “checkboxlistview” & domain name “com.codingtrickshub”. Then create the above structure in order to exactly follow the example. You can also create your own structure it’s up to you.
In this example, we are also going to create the services (PHP for server side + MySQL) to get the favourite categories of the user and insert the favourite categories on the basis of email.
Create the database name “checkboxlistview” (We will use this name in php files so you can change database name if you want, you will only have to change the name from the database connection code) and the run below scripts to create the desired database schema.
Here is the dummy data to be inserted into categories Table.
Now come to the services part.
I am using xampp server to host php files. I have created a folder under xampp/htdocs with name “CheckBoxListView” and placed two files inside that.Place these two files either on your local machine or place these on hosting and then use that url in the java files which we will create later to interact with the server.
1) insertUpdateFavouriteCategories.php
2) getFavouriteCategories.php
Now the android part begins. Here I have distributed the code in multiple files in order to manage the code properly.MainActivity.java in java folder and activity_main.xml in layout folder will automatically get generated when you create the empty project.
Starting from the layout files code placed the following code in the auto-generated “activity_main.xml” file which is inside layout folder.
Create another file inside layout folder with the name “row_category.xml” and placed the following code that file.
Now create folder name “model” inside the “java” folder and then under the “model” folder create a file with name “Category.java”. This is the model file with getter and setter.
Then we need the parsing functionality which receives the JSON data of categories from the database to parse and map that on the list view. For this, we also have to utilise the HttpClient to get the data from the server.
Create a folder named “serverCalls” inside “java” folder and inside the “serverCalls” folder create “FavouriteCategoriesJsonParser.java” file and place the below code inside that file.
On line 21 we are using the HttpGet function which requires the url from where the php files that we placed earlier gets called. If this is on your local machine you have to call it by the IP address of your system + file name otherwise if it is hosted on any remote server with the domain name you just have to place the domain name + filename.
We will also need the functionality to insert the selected favourite categories from the list view into the database and for that create “InsertUpdateFavouriteCategories.java” inside the previously created “serverCalls” folder which we created inside “java” folder. and place the below code in “InsertUpdateFavouriteCategories.java”.
On line 17 we are using the HttpPost function which requires the url from where the php files that we placed earlier gets called. If this is on your local machine you have to call it by the IP address of your system + file name otherwise if it is hosted on any remote server with the domain name you just have to place the domain name + filename.
When you add the previously “FavouriteCategoriesJsonParser.java” and “InsertUpdateFavouriteCategories.java” you will get the error in resolving the “Http” calls and for solving this issue you have to place ” useLibrary ‘org.apache.http.legacy’ ” insider “build.gradle” file. You build.gradle will look like this as shown below after adding this line.
On line number 6, our required line is added.
Now we want the adapter class which will act as a bridge between the data which we get from the server and the ListView which we are creating. Create a folder “adapter” inside the “java” folder and the create a file “CategoryAdapter.java” inside “adapter” folder. Place the below code inside this newly created file.
Till this point we have created the file to insert the data into the database, get the data from the database make the bridge between the data and the ListView rows now the final step is to show the list view on the screen and integrate all the previously created file to make the project up and running.
As we have discussed that we started the “Empty Activity” project which auto-generate the “MainActivity.java” file (by default) in the root of “java” folder.In this file we will create two async task, one is to get the categories list from the database and create the rows using CategoryAdapter.java and second is to insert the checked categories into the database as the favourite categories of that user (email). Place the below code inside the “MainActivity.java”.
Last but not the least (most important work), we have to add the INTERNET permission in the “AndroidManifest.xml” otherwise you will not get the result as expected. After adding the permission your “AndroidManifest.xml” will look like this as shown below.
On line number 6, our required permission is added.
Hurray! Finally, we are done with all the steps. Now run the application and verify the desired result.
Expected Result:
1) If we select the categories and click on submit button.
2) If we do not select any category and click on submit button.


how to maintain the checkbox state checked during sessions?
Thanks for discussing your concern. Using this method It will maintain the state checked if you are on same page.